Wednesday, June 27, 2012

I'm on twitter, too!


I'm following the development of the Scala IDE somewhat closely and report now and then a bug. The plugin gets better and better - there are still some quirks but there are workarounds for that.

For me it works best if I use the sbt compiler via command line in parallel to using Eclipse in order to  hunt down compile errors, since sometimes the IDE does show misleading information. This proved itself to be a good approach over time.

Maybe I would get less problems if I would use a stable released version? It speaks for itself If I can use the nightly builds without much hassle anyway ... :)


Sunday, June 24, 2012

JavaZone 2012: The Java Heist

I've discovered that embedding videos is quite easy in the blog, so here I go ;-)

If you have only a vague idea what "the java" is all about, you'll enjoy this video:


It's a promo trailer for Javazone 2012, a conference held in Oslo in September 2012.

From their website:

JavaZone is the biggest meeting place for software developers in Scandinavia, and one of Europe's most important. JavaZone has been described as a high quality, independent conference - a leading forum for knowledge exchange for IT-professionals.
A great place to meet people who may share the same interests than you are.

JavaZone is the biggest meeting place for software developers in Scandinavia, and one of Europe's most important. JavaZone has been described as a high quality, independent conference - a leading forum for knowledge exchange for IT-professionals.JavaZone is the biggest meeting place for software developers in Scandinavia, and one of Europe's most important. JavaZone has been described as a high quality, independent conference - a leading forum for knowledge exchange for IT-professionals. Each year around 2,300 conference tickets are sold. This years JavaZone is the eleventh and surely not the last.JavaZone is the biggest meeting place for software developers in Scandinavia, and one of Europe's most important. JavaZone has been described as a high quality, independent conference - a leading forum for knowledge exchange for IT-professionals. Each year around 2,300 conference tickets are sold. This years JavaZone is the eleventh and surely not the last.

Functional Programming

There are many great resources to learn functional programming available on the web.

A great  one to start is the great series Functional Programming Fundamentals by Dr. Erik Meijer on Channel9.


This is chapter one, but make sure you watch the other ones, too (see link above).

Another, more recent post is an interview with Tony M. and Runar B. :


Those guys are also working on a book which uses Scala to explain concepts of functional programming which is very well worth a read!

Saturday, June 16, 2012

Using embedded Jetty in your application: Example Code

In this post I want to describe how to use the jetty web server in your application. 

                                        freedigitalphotos.net
One of the great things about jetty is that it can be used standalone - that means there is some binary which acts as a "server" and then there are "archives" which can be deployed on that server - (web application archives). 

As a developer, you just have to obey certain rules for creating such an archive, that is to say you have to implement certain interfaces, fill out xml files with some meta information, and you are good to go.

Sometimes you want to distribute your web application and the server it runs on together, like the continuous integration server jenkins does.

Of course you could download the jetty server from it's site, bundle your war file which contains your application logic together, create an installer - but it is easier if you hide all the details from your user and provide just a plain jar file which, when double clicked, does the rest. 

Running an embedded jetty means:
  1. you have to integrate the server somehow with your sources
  2. you have to get from a main() method to the point where you start the web server
  3. you have to put all relevant classes in the jar file - not only your application logic but also all classes which are needed for the server
  4. you might be interested in delivering a compact binary without 'dead code' - so you might not use every feature jetty provides
  5. you want to have a short start up time and your webapplication should load its welcome screen.
  6. you want to stop the server again.
The first two points make it clear that you have to use internal jetty classes to initialize your main application. You have to tell those classes what web application is to be loaded, which port you want to use, the timeout you want to set, and some other things.

Point three and four clearly indicate that this is a job for proguard, since this is exactly what proguards can do very well.

Point five says something about the start up mechanisms. On the first run, all of your classes are contained in the jar file, they have to be unpacked, verified and what not - this can take some time.  It may be more efficient to unpack your jar and start then those classes. Thus you may want to support different scenarios here.

(You could also think about giving your application a nice splash screen, and start a browser in kiosk mode for example. The point is that you have a very fine grained control of the behavior of the server.)

For my example application, I need a configured web application and also means to serve static content.

I'm using jetty8 which means i have to include following dependencies in the maven pom:

<dependency>
    <groupId>org.eclipse.jetty</groupId>
    <artifactId>jetty-util</artifactId>
    <version>8.0.4.v20111024</version>
   </dependency>
   <dependency>
    <groupId>org.eclipse.jetty</groupId>
    <artifactId>jetty-servlet</artifactId>
    <version>8.0.4.v20111024</version>
   </dependency>
   <dependency>
    <groupId>org.eclipse.jetty</groupId>
    <artifactId>jetty-io</artifactId>
    <version>8.0.4.v20111024</version>
   </dependency>
   <dependency>
    <groupId>org.mortbay.jetty</groupId>
    <artifactId>servlet-api</artifactId>
    <version>3.0.20100224</version>
   </dependency>
   <dependency>
    <groupId>org.eclipse.jetty</groupId>
    <artifactId>jetty-http</artifactId>
    <version>8.0.4.v20111024</version>
   </dependency>
   <dependency>
    <groupId>org.eclipse.jetty</groupId>
    <artifactId>jetty-security</artifactId>
    <version>8.0.4.v20111024</version>
   </dependency>
   <dependency>
    <groupId>org.eclipse.jetty</groupId>
    <artifactId>jetty-xml</artifactId>
    <version>8.0.4.v20111024</version>
   </dependency>
   <dependency>
    <groupId>org.eclipse.jetty</groupId>
    <artifactId>jetty-server</artifactId>
    <version>8.0.4.v20111024</version>
   </dependency>
   <dependency>
    <groupId>org.eclipse.jetty</groupId>
    <artifactId>jetty-continuation</artifactId>
    <version>8.0.4.v20111024</version>
   </dependency>
   <dependency>
    <groupId>org.eclipse.jetty</groupId>
    <artifactId>jetty-webapp</artifactId>
    <version>8.0.4.v20111024</version>
   </dependency>


To create an application which starts a standard war and serving static content following code suffices:

package net.ladstatt

import java.io.File

import org.eclipse.jetty.server.Server
import org.eclipse.jetty.server.bio.SocketConnector
import org.eclipse.jetty.server.handler.HandlerList
import org.eclipse.jetty.servlet.DefaultServlet
import org.eclipse.jetty.servlet.ServletContextHandler
import org.eclipse.jetty.webapp.WebAppContext

class EmbeddedJettyServer

/**
 * Run application standalone
 */
object EmbeddedJettyServer {
  val staticUri = "/static"
  val idleTime = 1000 * 60 * 60

  def main(args: Array[String]): Unit = {
    println("Usage: java -jar net.ladstatt.web.jar [ ]")
    println("")
    println("Usage: you can either just start the jar file without arguments or provide the path to the unzipped installation providing arguments as follows.")
    println("")
    println("Example: java -jar net.ladstatt.web.jar c:\\temp\\unpacked 4711")
    println("")

    if (args.size == 0) {
      createSelfContainedServer
    } else {
      val jarRoot = new File(args(0))
      val staticRoot = new File(args(1))
      val port = args(2).toInt
      if (!jarRoot.exists) {
        println("Given program directory (%s) doesn't exist!".format(jarRoot))
      } else {
        if (!staticRoot.exists) {
          println("Given static file directory (%s) doesn't exist!".format(staticRoot))
        } else {
          val server = createServer(port, jarRoot, "/myExampleWebApp", staticRoot)
          try {
            server.start();
            System.in.read() // wait for user input
            server.stop()
            server.join()
          } catch {
            case e => e.printStackTrace
          }
        }

      }
    }
  }

  def createSelfContainedServer() {
    lazy val server = createServer(8080)
    try {
      server.start();
      System.in.read()
      server.stop()
      server.join()
    } catch {
      case e => e.printStackTrace
    }
  }

  def createServer(port: Int, basePath: File, baseUri: String, staticPath: File): Server = {
    val server = new Server()
    val connector = new SocketConnector()
    connector.setMaxIdleTime(idleTime)
    connector.setSoLingerTime(-1)
    connector.setPort(port)
    server.setConnectors(Array(connector))

    val handlers = new HandlerList

    val staticHandler = new ServletContextHandler
    staticHandler.setContextPath(staticUri)
    staticHandler.setResourceBase(staticPath.getAbsolutePath)
    staticHandler.addServlet(classOf[DefaultServlet], "/") 

    val webAppHandler = new WebAppContext(server, basePath.getAbsolutePath, baseUri)

    handlers.addHandler(webAppHandler)
    handlers.addHandler(staticHandler)
    server.setHandler(handlers)

    println("Starting webapp installed in %s on url : %s, static content served from %s on path %s".format(basePath.getAbsoluteFile, baseUri, staticPath.getAbsolutePath, staticUri))
    server
  }

  def createServer(port: Int): Server = {
    val server = new Server()
    val connector = new SocketConnector()

    connector.setMaxIdleTime(1000 * 60 * 60)
    connector.setSoLingerTime(-1)
    connector.setPort(port)
    server.setConnectors(Array(connector))

    val context = new WebAppContext()
    context.setServer(server)
    context.setContextPath("/")
    val protectionDomain = classOf[EmbeddedJettyServer].getProtectionDomain()
    val location = protectionDomain.getCodeSource().getLocation()
    println(location.toExternalForm)
    context.setWar(location.toExternalForm())
    server.setHandler(context)
    server
  }
}

As you can see, you can easily start from an jar file (see createServer(port: Int) method, or use a directory with the proper structure for it (means that it has to contain a WEB-INF directory and so on - just unzip a war file and you'll see what is necessary).

The above approach uses a mixture of programmatic configuration of the jetty web server and a declarative one - the web.xml configures the web application - therefore chances are high that above code could work with your war file, too.

Note: When using this approach, you are interested to create a jar file with a main class - this differs from distributing a war file.

This code opens also a door to start and stop a jetty webserver programmatically, which is very useful in respect to executing automated tests.

Thursday, June 14, 2012

Packaging Artifacts with Maven: Proguard Example

Don't underestimate how much effort it needs to get your program properly packaged.

It is nice - but not more - if the program works in your IDE.

It is of no value whatsoever if the  code doesn't make it to the production system since there are flaws in the chain after you've committed it in your code repository, or there are some manual steps involved which render a continuous integration scenario impossible.

A great part of maven copes with assembling artifacts together, zipping files, copying, or even deploying them to the proper place. You can get very creative with maven, you can even extend it with your own plugins (in maven speak: mojos). Quite easily.

It is not so easy to always know what is "the right way" to do it.

In my opinion it is nice if you have many options, but always prefer to keep it simple. Therefore, it is better if you use three standard tools which do the work sequentially, than to write your own optimized version of your very special process. 

Since the latter isn't so special really, have a look at the existing plugins, it will save you lot of work.

However, reading documentation is often the enemy which stands between you and your deadline. Doing it the right way depends on your knowledge at a specific moment in time.

You can and should always refactor your build definitions.

You could start for example by implementing certain steps of your build using a shell script or a bat file, or implement a process step in your favorite programming language. You can implement it 'natively' by configuring a multitude of maven plugins with a dozen xml files. Doing it the one way or another always depends on your knowledge, the team situation, available resources ...

Of course, you can get religious about this, but you shouldn't. It should be 'good enough'.

Some maven plugins which can be very helpful:

Every mentioned plugin has nice features which can serve you in many occasions, I'll highlight some usecases here.

Maven Assembly Plugin

This plugin comes in very handy if you want to create zip files. You can basically collect arbitrary files from the harddisk and put them via an xml configuration file in the zip file. You can even create directory trees inside the zip file for that matter. +1

Maven Shade Plugin


This is a very interesting thing: by providing 10 lines of xml you'll get a jar file with all dependent class files which enables you to have a standalone jar file. Very useful for distributing your application.

Maven Dependency Plugin


If you ever wondered about an easy way to get an artifact out of the central or your lokal repository - maybe to include it in your assembly - this is the way to go.

Maven Proguard Plugin


Proguard! I bet every Android Developer loves its capability to shrink jar files. Even better, it can obfuscate your code in order to make a reverse engineering very painful.

Maven AntRun Plugin


Who doesn't know Ant? Maven and Ant are good friends. This plugin is the bridge to the Ant world - which is definitely worth knowing.

Maven Exec Plugin


By using this plugin you can fork arbitrary java programs - or even native executables of your choice.

Using all the goodness

You can combine the plugins for example to do the following:
  1. create some artifacts with by using the antrun and exec plugin (binding them to certain phases in your build)
  2. get some stuff via the dependency plugin
  3. compile some other part of your system from your sources
  4. obfuscate or shrink the code with the proguard plugin
  5. use the jar plugin to create an executable jar file

You can imagine by this invented example that those tools can be part of a complex build scenario. I wanted to create here an example in order to get a feel how one can use these plugins.

Here is an example pom where aforementioned scala-compiler plugin is in action and also proguard plugin is configured.

<?xml version="1.0" encoding="UTF-8"?>
<project xmlns="http://maven.apache.org/POM/4.0.0" xmlns:xsi="http://www.w3.org/2001/XMLSchema-instance"
 xsi:schemaLocation="http://maven.apache.org/POM/4.0.0 http://maven.apache.org/maven-v4_0_0.xsd">
 <modelVersion>4.0.0</modelVersion>
 <parent>
  <groupId>net.ladstatt</groupId>
  <artifactId>ladstatt-pom</artifactId>
  <version>1.0.0-SNAPSHOT</version>
 </parent>
 <artifactId>ladstatt-util</artifactId>
 <packaging>jar</packaging>

 <build>
  <plugins>
   <plugin>
    <groupId>org.scala-tools</groupId>
    <artifactId>maven-scala-plugin</artifactId>
    <executions>
     <execution>
      <goals>
       <goal>compile</goal>
       <goal>testCompile</goal>
      </goals>
     </execution>
    </executions>
    <configuration>
     <scalaVersion>${scala.version}</scalaVersion>
     <jvmArgs>
      <jvmArg>-client</jvmArg>
      <jvmArg>-Xms64m</jvmArg>
      <jvmArg>-Xmx1024m</jvmArg>
     </jvmArgs>
     <args>
      <arg>-deprecation</arg>
      <arg>-dependencyfile</arg>
      <arg>${project.build.directory}/.scala_dependencies</arg>
     </args>
    </configuration>
   </plugin>
   <plugin>
    <groupId>com.pyx4me</groupId>
    <artifactId>proguard-maven-plugin</artifactId>
    <executions>
     <execution>
      <phase>package</phase>
      <goals>
       <goal>proguard</goal>
      </goals>
     </execution>
    </executions>
    <configuration>
     <maxMemory>2G</maxMemory><!-- we give em 2Gig of memory -->
     <assembly>
      <inclusions>
       <inclusion>
        <groupId>net.ladstatt</groupId>
        <artifactId>ladstatt-core</artifactId>
       </inclusion>
       <inclusion>
        <groupId>net.ladstatt</groupId>
        <artifactId>ladstatt-parser</artifactId>
       </inclusion>
       <inclusion>
        <groupId>net.ladstatt</groupId>
        <artifactId>ladstatt-contrib</artifactId>
       </inclusion>
       <inclusion>
        <groupId>org.scala-lang</groupId>
        <artifactId>scala-library</artifactId>
       </inclusion>
      </inclusions>
     </assembly>
     <options>
      <option>-dontobfuscate</option>
      <option>-allowaccessmodification</option>
      <option>-ignorewarnings</option>
      <option>-dontskipnonpubliclibraryclasses</option>
      <option>-dontskipnonpubliclibraryclassmembers</option>
      <option>-keep public class net.ladstatt.Util { *;}</option>
     </options>
     <outjar>${project.name}.jar</outjar>
     <libs>
      <lib>${java.home}/lib/rt.jar</lib>
     </libs>
    </configuration>
   </plugin>
   <plugin>
    <groupId>org.apache.maven.plugins</groupId>
    <artifactId>maven-jar-plugin</artifactId>
    <configuration>
     <archive>
      <manifest>
       <mainClass>net.ladstatt.Util</mainClass>
       <addClasspath>true</addClasspath>
      </manifest>
     </archive>
    </configuration>
   </plugin>
  </plugins>
 </build>

 <dependencies>
  <dependency>
   <groupId>net.ladstatt</groupId>
   <artifactId>ladstatt-core</artifactId>
  </dependency>
  <dependency>
   <groupId>net.ladstatt</groupId>
   <artifactId>ladstatt-parser</artifactId>
  </dependency>
  <dependency>
   <groupId>net.ladstatt</groupId>
   <artifactId>ladstatt-contrib</artifactId>
  </dependency>
  <dependency>
   <groupId>junit</groupId>
   <artifactId>junit</artifactId>
   <scope>test</scope>
  </dependency>
 </dependencies>

</project>


This shows how to configure the proguard plugin to use certain dependencies as 'program jars', also the scala library is included. I did not mention yet the maven-jar-plugin, which is configured in the above example in order to create a manifest file and a main class in that file in order to be able to call the artifact with

mvn -jar ladstatt-util-1.0.0-SNAPSHOT.jar

which will then call the main method of the net.ladstatt.Util class.

In the next post I'll give some comments on deploying a webapplication with embedded jetty.

Monday, June 11, 2012

Using Scala and ScalaTest with Maven


                                                  freedigitalphotos.net 
In a typical scenario maven is used to build java projects.

In case you want to include Scala code in your project, you can do this by using the maven-scala-plugin.

The plugin has reasonable defaults, configuring a scala project with maven has become quite trivial.

All you have to do is to include the following code in your build section of your pom.xml:


 <build>
  <plugins>
   <plugin>
    <groupId>org.scala-tools</groupId>
    <artifactId>maven-scala-plugin</artifactId>
    <executions>
     <execution>
      <goals>
       <goal>compile</goal>
       <goal>testCompile</goal>
      </goals>
     </execution>
    </executions>
    <configuration>
     <scalaVersion>2.9.1</scalaVersion>
     <jvmArgs>
      <jvmArg>-client</jvmArg>
      <jvmArg>-Xms64m</jvmArg>
      <jvmArg>-Xmx1024m</jvmArg>
     </jvmArgs>
     <args>
      <arg>-deprecation</arg>
      <arg>-dependencyfile</arg>
      <arg>${project.build.directory}/.scala_dependencies</arg>
     </args>
    </configuration>
   </plugin>
  </plugins>
 </build>

This suffices if you place your Scala classes in src/main/scala and src/test/scala

The jvm arguments give the Scala compiler a little more space which may speed up the compilation process.

Running Unit Tests with Scala and Maven


I'm using JUnit and ScalaTest in my project.  As a matter of fact, it doesn't really matter which framework you choose for your tests, as long as you write tests. If maintenance of tests is more of a concern at a later phase of the project, it will pay of that you apply the same quality standards to your test code as you do for your production code. 

I've learned that tests need a certain amount of work and attention in order to give you the revenue they promise. In trivial cases it is ok to cut'n paste in order to give test cases some variation, but this gets easily out of control - so be sure you create helper methods and classes which encapsulate complicated setup strategies in order to achieve a code reuse. It's more or less always the same.

Coming back to ScalaTest, it is a very nice testing framework which allows you to pursue different styles of testing, whatever fits best for your taste or environment. Here is a taste of ScalaTest:

package nxs.editor.usecases

import org.junit.runner.RunWith
import org.scalatest.BeforeAndAfterAll
import org.scalatest.FlatSpec
import org.scalatest.Tag
import org.scalatest.junit.JUnitRunner

object ATag extends Tag("ATag")

@RunWith(classOf[JUnitRunner])
class ExampleSpec extends FlatSpec with BeforeAndAfterAll {

  override def beforeAll() = {
    //  doReallyExpensiveSetup()
  }

  override def afterAll() = {
    //    cleanup()
  }

  "this" should "be really green" taggedAs (ATag) in { assert(true) }

}

ScalaTest is really very well documented on their site, have a look. 

You may have noticed I've using here an annotation org.junit.runner.RunWith - this is solely for the purpose to execute the Specs in Eclipse as tests. As soon as the IDE Support for ScalaTest is fully functional one could remove this annotation and have an equally comfortable integration. There is a video online where Bill Venners shows what can be expected for ScalaTest integration in Eclipse - I'm looking forward to it!

To integrate ScalaTest in your maven build you want to have something like this in your pom:
                      
   <plugin>
    <groupId>org.apache.maven.plugins</groupId>
    <artifactId>maven-surefire-plugin</artifactId>
    <version>2.7</version>
    <configuration>
     <skipTests>true</skipTests><!-- disable surefire -->
    </configuration>
   </plugin>
   <!-- enable scalatest -->
   <!-- see http://www.scalatest.org/user_guide/using_the_scalatest_maven_plugin -->
   <plugin>
    <groupId>org.scalatest</groupId>
    <artifactId>maven-scalatest-plugin</artifactId>
    <version>1.0-SNAPSHOT</version>
    <configuration>
     <reportsDirectory>${project.build.directory}/surefire-reports</reportsDirectory>
     <junitxml>.</junitxml>
     <filereports>WDF TestSuite.txt</filereports>
     <tagsToInclude>ATag</tagsToInclude>
    </configuration>
    <executions>
     <execution>
      <id>test</id>
      <goals>
       <goal>test</goal>
      </goals>
     </execution>
    </executions>
   </plugin>

you will also need the dependency for scalatest of course:

  <dependency>
   <groupId>org.scalatest</groupId>
   <artifactId>scalatest_2.9.1</artifactId>
   <version>1.7.2</version>
   <scope>test</scope>
  </dependency>

and a proper download site for the plugin:

        
 <pluginRepositories>
  <pluginRepository>
   <id>oss sonatype</id>
   <url>https://oss.sonatype.org/content/groups/public</url>
  </pluginRepository>
 </pluginRepositories>

But see for yourself here.

Thursday, June 7, 2012

How to get syntax highlighting to work on blogger.

Not.

Ok, first problems first.

How the heck do I integrate a decent syntax highlighting in blogger? After some googling I found that there are several tutorials to include the syntax highlighter of alex  but i didn't find a possibility to do this with the new design / template system of blogger.

On the linked page above are descriptions for the old design I suppose? Lets investigate.

After 1 minute reading I've learned that I have to include the links to alex website (he'll get some traffic if every blog pingbacks to his server ...) right after the <head> section.

 Lets try  to change the html code of the header.

...

Nope.

Not really surprised, though. Blogger wants you to stay away from HTML, which is perfectly ok, but there must be some kind of expert mode.

After fiddling around for 10+ minutes I managed to find the button to download the raw source code of the template, and, recalling my HTML experiences stemming from Netscape- times i finally managed to insert the 10 lines including the necessary javascript. After happily clicking on upload/restore I finally got  an error, again.

Thinking that I somehow got a typo in my inserted script links, I made a second test: Just backup and restore without changing the xml should produce no errors.

Here is the result:
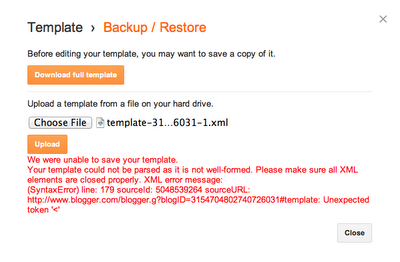
If you have a backup strategy, try it at least once.
Maybe somebody was more successful and can enlighten me.

For the moment, i go with the service of http://codeformatter.blogspot.com/  which produces output like this:

1:   @Test  
2:   def testIfTableWidthIsConstant() = {  
3:    for ((k, l) <- mpReader.rawMap) {  
4:     assertEquals("Configuration %s is corrupt for Entry %s: width should be %s but was %s. Please remove blank entries in this line!".format(mpReader.mpExcelFile, k, mpReader.tableWidth, l.size),  
5:      mpReader.tableWidth, l.size)  
6:    }  
7:   }  


Seems good enough, even though some colors would be nicer.

Update

Now I realized that using the "Simple layout" makes all problems disappear?! Evil "Dynamic Layout"! ;)

Anyhow, following the tutorials posted here it is now easy to setup syntax highlighter.

Here is the result:

<h1>header</h1>
<p>this is an example for html brush</p>

I've escaped the above html, inserted it afterwards in "HTML" mode. Used Quick Escape which seems to do the job.

If you just enter plain html between the <pre> tags you'll get this:

header

this is an example for html brush


Note: in editor's mode the syntax highlighting doesn't seem to work, which makes sense if you think about it. The second example destroy pretty much also the layout in edit mode.


Alas, now I can include code in my posts like this:

class OutputXmlParser(src: BufferedSource) extends ScalaLangUtils {
  require(src != null)

  var curMeasurement: MeasurementBuilder = _
  val measurements = new HashMap[String, Measurement]

  class MeasurementBuilder(val id: String) {
    val points = new ListBuffer[Pos]
    def +=(p: Pos) = points += p
    def toMeasurement = Measurement(id, points.toList)
  }

  def getMeasurements: Map[String, Measurement] = {
    val er = new XMLEventReader(src)
    while (er.hasNext) {
      er.next match {
        case EvElemStart(pre, label, attrs, scope) => label match {
          case "measurement" => curMeasurement = new MeasurementBuilder(attrs.asAttrMap("id"))
          case "p" => curMeasurement += Pos(attrs.asAttrMap("x").toDouble, attrs.asAttrMap("y").toDouble)
          case x => logTrace("elemstart>ignoring: " + x)
        }
        case EvElemEnd(pre, label) => label match {
          case "measurement" => measurements(curMeasurement.id) = curMeasurement.toMeasurement
          case x => logTrace("elementend>ignoring: " + x)
        }
        case x => logTrace("event>ignoring: " + x)
      }
    }
    measurements.toMap
  }

}

Maybe it can be improved, but it works good enough for the moment.

Of course the code looks still nicer in the ide of your choice:

Screenshot of a code snippet in eclipse with Scala IDE
Code sharing should be done at least in 2012 on GitHub. I'll do this if my examples really make it to a shape I'm (at the moment of posting) not to embarrassed of.


Sunday, June 3, 2012

Again, blogging. :)

This is my 4th attempt of a personal blog, all previous version got buried somewhere in the digital graveyard.

Not quite sure where to go, I finally decided to try out blogger.

Where to go?


My last blog was titled "rlog" which had quite some visitors and gained some attraction, but it was self hosted with a wordpress installation which had to be patched every week. This was the main reason I've abandoned it.

This problem should not exist with a cloud hosted blog I hope.

This blog will be mainly about programming (my passion), but we'll see. Have fun reading.